Nails by Kassidi
  • Home
  • Services
    • Pricing
    • Gallery
  • FAQ
  • Appointment
  • Blog
  • Contact

Young Nails Extravaganza with Greg Salo - Feb 22 & 23

2/25/2015

1 Comment

 
Picture
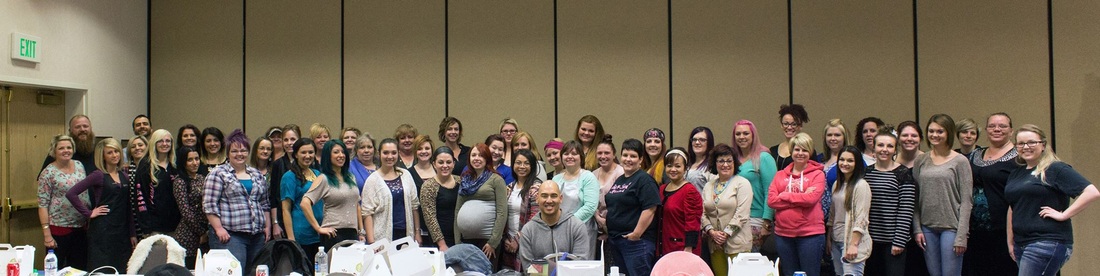
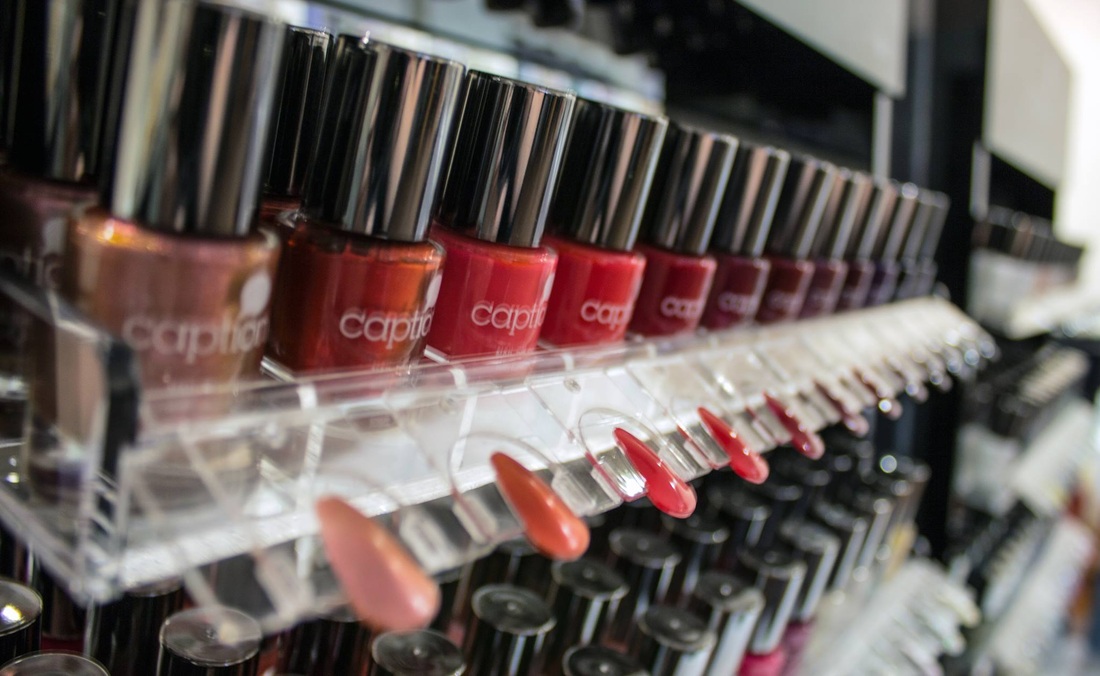
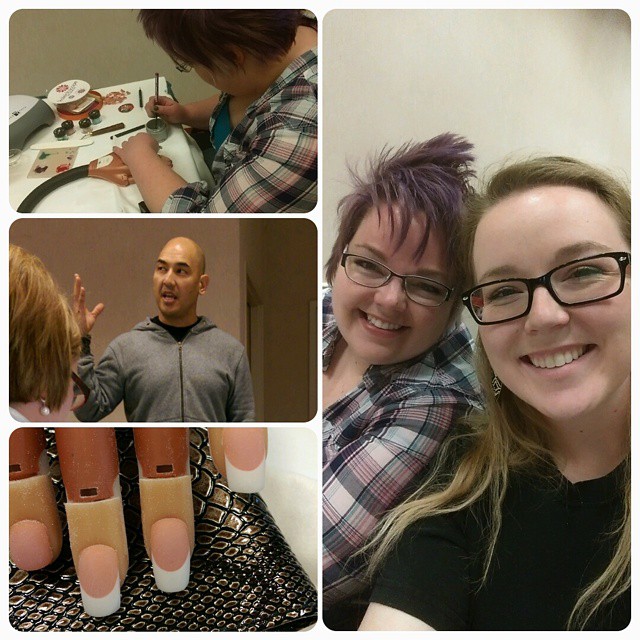
Brittany and I were able to attend the Young Nails Extravaganza with Greg Salo this week, and it was a great weekend packed with tons of tips and tricks and education. I learned a lot about Caption polish since they just launched it. At first I thought, "Really, another polish?" But it has some amazing properties that other brands just can't compete with. It has LAQ3 technology so it dries 3 times faster with no UV light. It lasts similar to gel polish, and the base coat is infused with ingredients that actually strengthen your nails. 
Picture
We also learned traditional Gel and Acrylic, and perfected smile lines. 
Picture
1 Comment

Gel Nails

4/8/2014

0 Comments

 
The world of Gels is quite new to people. I'd like to educate you guys so you know a little more bout it. When you ask for a gel manicure, what are you getting? 

If they're using a liquid and a powder, it's not gel. Most of the time Gel is odorless, and it looks a lot like hair gel. It has to be cured with a light and most gels have a sticky surface that's left behind after it's been cured. 

There are several different types of gel, but they can be broken down into 2 categories. Soft gel and hard gel. 

Hard Gel:
  • Adds length to the nail
  • Non-flexible or rigid
  • Must be filed off by a professional to prevent damage to the natural nail
Soft Gel:
  • Is flexible
  • Adds no length
  • Can be soaked off in acetone
  • Creates a polished look, that doesn't chip for 3+ weeks (depending on the brand)


So what about Shellac? Shellac is a brand of soft gel. It is a mix of polish and gel to create a "power polish." This gives you the chip free manicure that lasts 2 to 3 weeks, but since it incorporates polish, it doesn't have the lasting power of a true gel.  

I exclusively use Young Nails product, and their soft gel is called mani•Q. It is a true gel with pigments creates the color. This provides the longer lasting manicure.  


If you have further questions feel free to contact me!
0 Comments

Safe Salons

3/6/2014

1 Comment

 
ABC News did a story on nail salons, and I thought I would pass along some information. There are germs everywhere, and if your nail tech isn't being careful, you could be in serious trouble. Here are some questions to think about the next time you visit your salon. 

"Are You In A Safe Salon? - Athena Elliot
March 7, 2014 at 12:57am

• Did YOU and your technician wash hands before the nail service? According to the CDC, “Clean hands save lives”. Safe salons include universal precautions such as single use disposable latex-free gloves for every service

• Is the restroom clean with hot water, liquid soap and clean towels? A dirty restroom is a good sign the rest of the salon is not clean. Leave Now!

• Does the salon look clean in general? Dusty furniture, debris and nail clippings on the floor and food in in work area should make you think twice about having that mani & pedi. 

• Are you communicating with your Nail Technician, are they not listening to you? There is more to having a good service than just picking out your nail color. If you can’t communicate, chances are you won’t be happy with your service. Miscommunication is a primary cause of nail salon infections and lawsuits from infections.

• Does the salon offer single-use disposable files, buffers and wooden sticks? Used and dirty nail files, sanding bands and buffers are a sign this salon is not following a top notch sanitation protocol. Insist on new files and buffers for every service or find a Safe Salon.

• Did you see where the tools, files & buffers were stored? If the tech pulled these items out of a dirty drawer or container, it’s time to get up and leave.

• Does the salon have a container with a jar of liquid disinfectant, in sight? Ask the technician to disinfect the tools by soaking them for 10 minutes in a mix of fresh solution.

• Does this salon use an autoclave to sterilize their metal nippers and nail clippers? Salons that use autoclaves will be happy to show you and tell you they use the highest level of sterilization. A lot of salons use sealed bags to give the appearance of sterilized tools. Look for a “change indicator” such as letters and arrows that change colors when the autoclave reaches the correct temperature. The package will appear shrink wrapped , resulting from heat and pressure. Sterilization is defined as the process where all the living microorganisms, including bacterial spores are killed. Sterilization is an absolute condition while disinfection is not.

• Did your technician offer to use a razor blade, cheese grater or a “shop sander” to remove the calluses on your feet? Get up and leave now while you still have feet you can use. Safe Salons offer single use foot files and will explain how long “callus treatments” should be on the skin before removed.

• Can you see a brand name or at least an identifying label on what’s being used on your hands or feet? This is your body!

• Are the foot basins clean? Safe Salons will explain in detail the sanitation and disinfection of the foot baths. They will show you a bottle that will clearly state the product is a hospital or medical disinfectant. For your protection, put your toes where no feet have gone before and choose a salon that offers single use tub liners

• Did you forget you had an infected cuticle or an open sore on your foot, when you showed up for services? Safe Salons will not work on clients with these conditions and will ask you to return when you are healed.

If your service was painful YOU are NOT in a Safe Salon."


I personally use disposable plastic liners for each pedicure, and sanitize all implements in ultronics hospital-grade disinfecting solution between clients. Each client gets a new sanding band, and nail file. 


The bottom line is if you don't feel safe at a salon, don't sit down, and if you've sat down and start to feel uncomfortable, get up and leave. 
1 Comment

Part 3 of 3: Gel Enhancement Removal

2/24/2014

1 Comment

 
Proper removal of your enhancement, weather it be gel, acrylic, or gel polish, is vital to the health of your natural nail. These enhancements are adhered to your natural nail, and if not removed properly they could leave behind less nail than what you started with. 

If you've been keeping up on this series of posts, you know that I always recommend going to a reputable salon to get your enhancement removed. It is safer, and easier on your natural nail. If you're in a bind, or can't get to someone, I have posted some general guidelines to help you with your enhancement removal at home. 

As you know, Gel is a different enhancement than acrylic. If they applied anything with a liquid and powder, this is not gel! Read more about this on my FAQ. Removing gel nails at home is even more tricky than removal of acrylic. Almost all gel nails are not soluble! Meaning nothing is going to break it down. If you've ever tried to remove gel nails by soaking in acetone, you know that it doesn't work! Anyways, lets get on with it:
Things you'll need:
  • Toenail clippers
  • A 150 grit nail file
  • A 240 grit nail file
  • 30-60 minutes
(The nail files don't have to be exactly this grit. You want one that is course, and another that is fine grit)
Picture
Picture
Picture
Step 1: Clip the length of the nail just past the end of your finger. One clip with the toenail clippers on the edge of the enhancement should take the entire extension off. If not, clip the other side and gently remove the length of the nail. 

Step 2: Gently use the nail file to thin out the bulk of the nail by using gentle back and forth motions on the top of the enhancement. Don't use pressure! Let the file do the work. One of the great benefits of gel is it files a lot easier than acrylic. You will notice that it doesn't take much time to thin the enhancement. 

Step 3: If you can stand it, leave a thin layer of the gel on your nails. There are a few reasons for doing this. 
  • It'll help avoid doing damage to your natural nail with the file.
  • You will still have a little bit of strength.
After you've removed a considerable amount of gel from your nail, use the 240 grit file to thin the enhancement even more. Remember, let the file do the work. Eventually you'll be able to tell where the natural nail is, and where there is still gel. You only want to file where the gel is! Don't file on the top of your natural nail. This will lead to excessive thinning of the nail plate, and weak thin nails. Don't forget to smooth the edge of the nail with the file. 

I have a new system called IBX that is a wonderful strengthening treatment after removal of an enhancement, or if you have really thin natural nails. I am adding this to all my removal services, so there is another reason to save yourself some time, and get them removed by a professional. 

Once you're done removing the enhancement, I would recommend using a good quality cuticle oil to rehydrate your nail and the skin surrounding your nail. Also, a strengthening polish is a good idea. I recommend O.P.I's Nail Envy. 
If you have questions, don't hesitate to call me.
1 Comment

IBX Nail Strengthening System

1/29/2014

3 Comments

 
Picture
I have purchased this revolutionary product and used it on my nails twice. There is nothing like IBX on the market right now. It isn't an enhancement, and doesn't add any bulk, or coating on your nail, but instead creates strength from within. My nails are terrible from two things, changing them too often, and a medication I'm taking. After using this IBX System, my nail plate is substantially stronger. Ask for this at your next appointment! 

Get more information from their website. 

This innovative two-part system offers revolutionary benefits:

Under Gel Polish
  • Creates a protective shield for the nail
  • Reduces white spots that tend to occur with the use of Gel Polish
  • As a Natural Nail Growth Treatment
  • IBX Repair is used to repair severe nail damage to set the stage for growth
  • IBX toughens the upper layers of the nail plate allowing nail growth
  • With multiple treatments fills up deep grooves resulting in a smoother nail plate
  • Natural nail color and appearance improved

3 Comments

Part 2 of 3: Acrylic Enhancement Removal

11/4/2013

1 Comment

 
Proper removal of your enhancement, weather it be gel, acrylic, or gel polish, is vital to the health of your natural nail. These enhancements are adhered to your natural nail, and if not removed properly they could leave behind less nail than what you started with. 

Removing acrylic nails at home is quite tricky, and its advised you go to a reputable salon to get them removed. If you do go into a salon and they to pry or pick off the nail, or if they cause you any pain, don't hesitate to leave. If you have time, make an appointment with me to get your product removed. It will save you time and hassle. If not, follow these steps below:


Things you'll need:
 A small glass bowl
Toenail clippers
Orange wood stick 
100% pure acetone
a nail file
and 30-60 minutes. 

Step 1: Clip the length of the nail just past your finger. One clip with the toenail clippers on the edge of the enhancement should take the entire extension off. If not, clip the other side and gently remove the length of the nail.

Step 2: File the surface of the nail until it is no longer shiny. Acetone can't penetrate the surface of gel, and removing the top coat will ensure that the acetone can breakdown the acrylic. If the nail is thick, using the file, thin down the product before the next step. This will save time.

Step 3: Fill the bowl with enough acetone to cover your nails. Place your fingers in the acetone for 10 minutes. It is important that you leave the entire nail in the acetone for 10 straight minutes. Don't take them out to look at the progress or whatever. It will stop the acetone from breaking down and just cause it to take longer. 

Step 4: Take your fingers out of the acetone, and use the orange wood stick and gentle pressure to scrape off the gummy acrylic surface. 

This likely won't take off the entire nail in one go, so repeat steps 3 and 4 until the entire nail is removed, and you're left with your natural nail.

You can also use the tin-foil method, as described here.
Picture

Acetone is very drying, so I would recommend using a good quality cuticle oil to rehydrate your nail and the skin surrounding your nail. Also, a strengthening polish is a good idea. I recommend O.P.I's Nail Envy. 
If you have questions, don't hesitate to call me.


1 Comment

Part 1 of 3: Gel Polish Removal

8/30/2013

0 Comments

 
Proper removal of your enhancement, weather it be gel, acrylic, or gel polish, is vital to the health of your natural nail. These enhancements are adhered to your natural nail, and if not removed properly they could leave behind less nail than what you started with. 

The removal process of gel polish (Shellac, Gelish, maniQ, Axxium) is all generally the same. I won't go over the differences between each brand, but I will tell you the safest way to remove a gel polish service you got from me.

If you have time, make an appointment with me to get your product removed. It will save you time and hassle. If not, follow these steps below:

Things you'll need:
1. 100% Acetone
2. Orange woodstick
3. Cotton balls
4. Tin foil
5. File, or buffer
Optional: Cuticle oil

Step 1: Use the file or buffer to remove shine from the entire remaining product. Be gentle and let the file do the work for you. Don't apply much pressure at all. This step is vital, because if you don't remove the shine, the acetone can't penetrate the product.

Step 2: Saturate a cotton ball with acetone. You don't need to use an entire cotton ball. Just enough to cover the nail. 

Step 3: Use a small strip of tinfoil to hold the cotton in place. There are a few reasons we use tin foil. It conforms when we manipulate it, and its also going to seal any heat in your fingertips to help that acetone do its job. Follow the picture below.
Picture
Repeat this on all 10 fingers. It's kind of tricky to wrap your own left hand so sometimes it's easier to do one at a time. Leave this on for about 10 minutes.

Step 4: Start with the finger you wrapped first, pull the tin foil straight off your finger, it should take the cotton, and you might be left with some flakes of product on your nail. If that is the case, GENTLY push them with the wooden pusher. If they don't come off, you didn't leave the acetone on long enough. If they don't come all the way off, rewrap them and leave them a little longer.

Acetone is very drying, so this is where you would want to use your cuticle oil to rehydrate your nail and the skin surrounding your nail.

You can also do this to your toes. It's a little hard to wrap them, but you just follow the same steps. If your nails were done in hard gel, you won't be able to get them off using this method. 

If you have questions, don't hesitate to call me.
0 Comments

IBS Las Vegas!

6/25/2013

0 Comments

 
Picture
I just got back from IBS Las Vegas, and there were a lot of nail booths there this year! I was disappointed that I didn't see a few of my favorites, but I learned a lot about new brands. I took a lot of classes including: Nails in Overdrive, Perfect Transformation, and Flawless Filing by John Hauk.  I also took I'm Not Your Nail Girl by Jamie Schrabeck Owner of Precision Nails.

In addition to all the great education I received, I was able to purchase some state of the art products! (Including a nail dust vacuum I've been talking about forever!) Make an appointment to check out all the new stuff! *hint hint!*

I had a great time and am excited for next year. 
0 Comments

Attention All Nail Biters!!!

5/15/2013

1 Comment

 
Picture
"Studies show 60% of children and 45% of teenagers bite their nails." - WebMD


Your nails might not be your top priority, and keeping them looking great isn't your biggest concern, but chewing your nails and skin surrounding your nails can lead to serious infection. 


Picture
"Both of these fingers are pinky fingers but due to infection one has swollen. Biting the nails has left an open wound inviting along a nice little infection to come play, this causes severe pain and the need for strong antibiotics in this case- some need to be sliced open- fingers crossed for the owner of this nail that the antibiotics work.

This person is "never biting my nails again"!!
Whilst in this instance, this infection is caused by a nail biter it could also occur if for example dirty tools are used for a nail treatment. 
Any open wound that is not kept clean could get like this." - Beauty and Bronze, Brentwood  

Check out my post on paronychia like this here.

A tried and true way to stop nail biting is to get regular manicures. Your cuticles will be moisturized and taken care of properly, and you won't have a reason to pick at them. Your nails will also be shaped, and nice and even. Enhancements have also been known to help biters quit that habit! You don't need to add length to add strength to your nails. If you're a nail biter, set up an appointment now and I will help you get over that nasty habit!

Questions? Submit them here, and I will add them to my FAQ! 
1 Comment

What is a Cuticle?

3/22/2013

1 Comment

 
Cuticle is a word that is almost always incorrectly used. The living skin at the base of the nail plate is not cuticle. It is eponychium. Here is a diagram to help describe my point.

Picture
Cuticle is the dead skin on the nail plate, and any skin that is alive is not the cuticle but eponychium. It is very important that you, and your manicurist understand the importance (and the difference!) of the cuticle and eponychium.
The cuticle comes from underneath the eponychium, (as shown in the diagram) and is one of the stickiest tissues on the entire body. It bonds to the new growth of nail creating a seal, and as the nail plate continues to grow, it takes a thin layer of skin (cuticle) from under the eponychium. This dead skin the eponychium constantly sheds continues to grow with the nail plate and is the true cuticle. This skin creates a barrier that prevents infections organisms from invading the nail matrix, which is the part of your nail anatomy that creates the cells of your nail plate.

Now that you know the difference, why is this important?

The cuticle (dead skin) can prevent proper adhesion of polish and enhancements, so it is removed before any service. Improper removal, or removal with un-sanitized tools can cause a plethora of problems for your nails. Another common mistake is nipping away the eponychium in order to create a healthier looking nail. This just causes the eponychium to become harder and more unmanagable each time it grows back, and it becomes more and more unruly and creates hangnails and all sorts of issues. Always make sure your technician sanitizes her tools, and is not removing any of your living eponychium.

“During a properly performed manicure or pedicure, the eponychium is softened, moisturized and then very gently pushed back to expose the dead cuticle tissue on the nail plate for easier removal.” – Doug Schoon

If you have dry eponychium, or constantly get hang nails, I would highly recommend daily use of cuticle oil. Dadi Oil form Famous Names is my all time favorite. It smells great, and penetrates the nail bed and eponychium quickly leaving a non-greasy feel.  If you would like some, I can get it for you, just email me. Another favorite is O.P.I.’s Avoplex Cuticle Oil to go. I would recommend using either of these several times a day, and if you’re consistent, I guarantee you will see a difference.
"Manicures: The True Cuticle." Falishak. N.p., n.d. Web. 05 July 2012. <http://www.falishak.com/blog/manicures-the-true-cuticle/>.

Schoon, Doug. "Where Is The Cuticle." Professional Beauty Magazine July 2007: n. pag. Schoon Scientific. Web. 5 July 2012. <http://www.schoonscientific.com/resources-publications-technical-articles.html>.

1 Comment
<<Previous
    Picture

    Author

    My mom started a nail business in 2000, and I was just 10. Then when my older sister went to cosmetology school, I decided I wanted to be a Nail Technician and I have loved it since day one. Learn more about me on my about page...

    Categories

    All
    Cuticle
    Nail Anatomy
    Nails For Dummies
    Paronychia
    Removal
    Uv Lamp

    Archives

    February 2015
    April 2014
    March 2014
    February 2014
    January 2014
    November 2013
    August 2013
    June 2013
    May 2013
    March 2013
    January 2013
    September 2012
    July 2012
    June 2012
    May 2012
    April 2012
    March 2012

    RSS Feed

Powered by Create your own unique website with customizable templates.